Use Camtasia to edit and upload at 60 fps
Hi everyone! Today I will be teaching all of you how you can edit and upload in Camtasia at a smooth and crisp 60 fps. Anyways, let’s get straight into the tutorial!
1. First, launch Camtasia. Then, to edit at 60 fps what you must do is actually really simple! Go to Edit, and then preferences.

2. Once that’s done, go to Project and change the frame rate from 30 fps to 60 fps. Now you’re done! Just relaunch the application and once you’re done you can edit at 60 fps. Now, let’s get to uploading at 60 fps!
3. First, go to Share and then Local File.

4. Once that’s done, go to the scroll menu and click on Add/Edit preset…

5. Now a menu should pop up. Once that happens, go below the scroll menu and click on, New…

6. Now name the preset, I will call mp4 60 fps. Once that’s done click on next

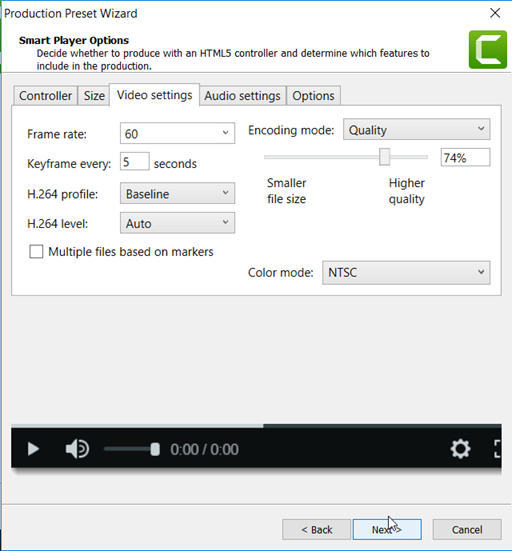
7. Now go to video settings and make it so that the settings are quite similar or the same as the ones below.

8. Now click on next and then finish. You’re now done! You can now upload and edit your videos in Camtasia at 60 fps. I hope all of you have enjoyed this short and quick tutorial and I’ll be seeing all of you in the next one.
Twitter @FrostedFright
Author: Angus Sun
Angus is excited to learn as much as he can about Microsoft and
other technologies. The one thing he likes is computer programming and technical writing. He also likes playing video games whenever he has spare time. Other than that, he just spends time writing blogs and creating videos.
