Hello there GDM fans and today I will be teaching you all about PowerShell! I’ll be showing you some simple commands and followed after that I will show you some little features you can do to customize your PowerShell layout, so it can look more professional! Let’s get started.
- First, you should go inside of command prompt, so you can test out some basic commands to get the hang of PowerShell. If you don’t know how then don’t worry it is simple! All you need to do is go down into the windows search bar and search “cmd” and command prompt should show up, just click on it and you are ready to go!

2. Now if you are new to Windows PowerShell or you are a little rusty here are some commands that may help warm you up!
dirthis command will show a directory of what you have on your computer.
"cd"this command will let you change your drive in your directory, for example, you can type “cd” and then type “d:” and it will change you to the D drive
3. Now all of that was just simple commands inside of command prompt but now let’s look at Windows PowerShell.
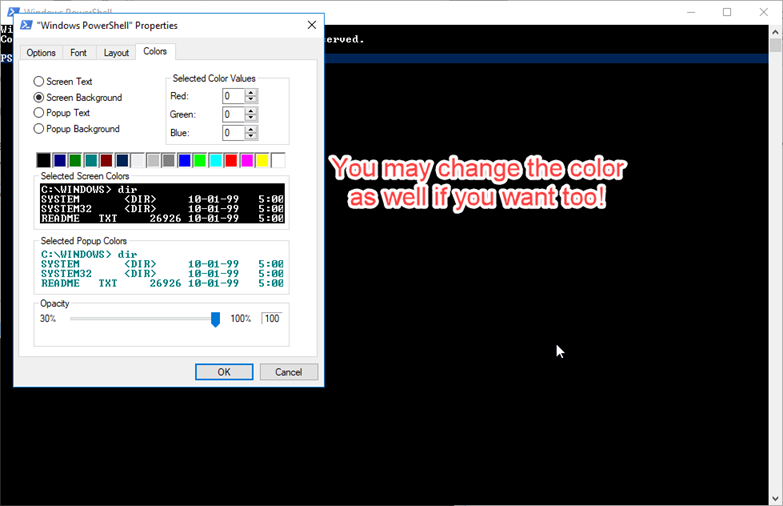
4. Now, go into the search bar again and search up Windows PowerShell, you may see a bunch of versions of PowerShell but let’s look at the standard Windows PowerShell program for now.
5. When you open PowerShell, you may think that it is basically just command prompt, but it is actually more flexible and also more powerful as well! But we’ll get into that later since we need to customize the Windows PowerShell window. The way to customize Windows PowerShell is to go to the icon when you are in the application and press on it, after that you press on properties.
6. Now that you have opened properties you can start customizing the look of your Windows PowerShell Application! I’ll leave the recommended settings below but if you want to do a different style then go ahead!
Now click on okay and are good to go in the customizable section!
7. You can also make a Windows PowerShell shortcut on your computer just by searching PowerShell on your computer again and by right-clicking PowerShell and pressing on “open file location”
8. Now you just need to right click on the Windows PowerShell inside of the folder and you can create a shortcut in there, after that you can just cut and paste it onto your desktop and you are good to go!
Hope you all enjoyed this quick tutorial and I will be seeing you all on the next blog!
TO BE CONTINUED…

Author: Angus Sun
Angus is excited to learn as much as he can about Microsoft and
other technologies. The one thing he likes is computer programming and technical writing. He also likes playing video games whenever he has spare time. Other than that, he just spends time writing blogs and creating videos.


