As we know, you can easy to create VMs, Firewalls, Load Balancers on Microsoft Azure, you also can make routing path change but all of them will cost you lots of money, it depends on how many virtual devices or virtual machines that you created.
Today, I am going to show you how to build Hyper-V nested VM with multiple public IP address, you just need to pay Microsoft for one Hyper-V host with storage space and public IP addresses, you can install firewall, created lots of VMs, load balancer, control routing path, port forwarding and so on, we can use them for LAB test, POC, or even production.
Let’s follow step by step to show you how to do that.
Create Hyper-V Host VM at Azure
-
Logon to your Microsoft Azure Account and select Create a resource.

-
On the New page, select Windows Server 2016 VM

-
On the Create a virtual machine page, click Basics and select your Azure Subscription to pay for this virtual machine.

-
Select Create new under the Resource group and enter resource group name, I will recommend it as your virtual machine name, because it will easy to maintain your resources, and then click OK.

-
Virtual Machine Name: Enter Virtual Machine Name as your resource group name.
Region: Select Region for the virtual machine. For my case, I am using West US 2.
Availability options: keep default setting
Image: select Windows Server 2016 Datacenter
Size: click change size and select the Dv3 and Ev3 VM sizes. Because we need to enable nested virtualization.
Username: Enter login user name
Password: Enter login password
Confirm password: Reenter login password

Public inbound ports: Select Allow selected ports.
Select in bound ports: Select RDP (3389)
Already have a Windows license: Select Yes if you have license already.
Confirmation: select I confirm I have an eligible Windows license with Software Assurance or Windows Server subscription to apply this Azure Hybrid Benefit.

-
On the Create a Virtual Machine page, click Disks.

OS disk type: Select Premium SSD
DATA DISKS: Select Create and attach a new disk (this storage space is for your nested VMs)

-
On the Create a new disk page, settings as follow and then click OK.
Disk type: Select Premium SSD
Name: keep the default name
Size(GiB): 4095
Source type: None

-
On the Create a virtual machine page, click Networking.

Virtual network: Select vnet if you have existing vnet, if don’t, you can keep the default settings.
Subnet: Select subnet name if you have existing subnet, if don’t, you can keep the default settings.
Public IP: click Create new

-
On the Create Public IP address page, settings as follow and then click OK.
Name: Enter Public IP address name.
SKU: Basic
Assignment: Static
-
To complete Networking settings as follow:
Network security group: Basic
Public inbound ports: Allow selected ports
Select inbound ports: RDP
Accelerated networking: On

-
On the Create a virtual machine page, click Management and keep the settings as default.

-
On the Create a virtual machine page, click Guest config and keep the settings as default.

-
On the Create a virtual machine page, click Tags and keep the settings as default.

-
On the Create a virtual machine page, click Review + create and make sure Validation passed and then click Create.

Crete Multiple IP address
-
On the Microsoft Azure portal page, select Virtual machines.

-
On the Virtual machines page, click GDMCALABHV1.

-
On the GDMCALABHV1page, select Networking.

-
On the GDMCALABHV1-Networking page, select Network Interface: gdmcalabhv1238.

-
On the Network Interface page, select IP configurations.

-
On the IP configurations page, select ipconfig1.

-
Change assignment setting from Dynamic to Static, and then click Save.

-
Go back to IP configurations page, click Add.

-
On the Add IP configuration page, settings as follow and then click OK.
Name: ipconfig2
Private IP address Allocation: Static
IP address: 10.10.1.9
Public IP address: Enable
IP address: click configure required settings

Choose public IP address: Create new
Name: Enter name for Public IP
SKU: Basic
Assignment: Static and then click OK

-
On the Add IP configuration page, click OK.

-
Repeat Add IP configurations steps If you need more public IP addresses.

Enable Hyper-V for Azure virtual machine
- Start Azure virtual machine and login.
-
Open disk Management to partition and format for your new 4TB storage space.

-
On the Server Manager Dashboard, click Add roles and feature.

-
On the Before you begin page, click Next.

-
On the Select installation type, select Role-based or feature-based installation and then click Next.

-
On the Select destination server page, click Next.

-
On the Select server roles page, select Hyper-V, click Add Features and then click Next.

-
On the Select features page, click Next.

-
On the Hyper-V page, click Next.

-
On the Create Virtual Switches page, don’t select any interface and click Next.

-
One the Virtual Migration page, click Next.

-
On the Default Stores page, you can change the default location to your new 4TB storage space and then click Next.

-
On the Confirm installation selections page, select Restart the destination server automatically if required and then click install.

- Login to Azure Virtual machine after it restarted.
-
On the installation progress page, click Close.

NAT networking with one Public IP address
We need to create Internal Virtual Switch for nested guest VMs, in general, there are two options for networking with nested virtual machines, MAC Address Spoofing and NAT networking, unfortunately, MAC Address Spoofing is not possible in a public cloud environment, so If you use Azure virtual machine network interface to be Hyper-V external virtual switch and assign to nested guest vms, the guest VMs won’t possible access to the Internet , we have no choice, we just can use NAT networking for them. If you just have one public IP address and then we can create internal virtual switch and create NAT rules via Powershell cmdlet as follow:
NNew-VMSwitch -Name "NATNetwork" -SwitchType Internal
Get-NetAdapter
New-NetIPAddress -IPAddress 192.168.100.1 -PrefixLength 24 -InterfaceIndex 14
New-NetNat -Name "NATNetwork" -InternalIPInterfaceAddressPrefix 192.168.100.0/24

You also can configure port forwarding by Powershell cmdlet as follow:
Add-NetNatStaticMapping -ExternalIPAddress "0.0.0.0/24" -ExternalPort 443 -Protocol TCP -InternalIPAddress 192.168.100.99 -InternalPort 443 -NatName NatNetwork
Add-NetNatStaticMapping -ExternalIPAddress "0.0.0.0/24" -ExternalPort 80 -Protocol TCP -InternalIPAddress 192.168.100.99 -InternalPort 80 -NatName NatNetwork

NAT networking with multiple public IP addresses
For the real POC or production environment, we may need more than one public IP address, it won’t easy to use Powershell cmdlet to do port forwarding or maintain them, here, I am going to show you how to use Multiple IP address for nested VMs and easy to configure port forwarding.
- Login to Azure Virtual Machine.
- Open Command prompt and run ipconfig /all and then write down the DNS IP address.
-
Add all of IP addresses to the Azure Virtual Machine network interface, for my case are 10.10.1.8-10

-
Re-run ipconfig /all again and you will see that all of IP addresses under the network interface.

-
Open Hyper-V Manager tool and click Virtual Switch Manager.

-
Select Internal and click Create Virtual Switch.

-
Change switch name to NAT Network Switch and then click OK.

-
Assign IP address as 192.168.100.1/24 to vEthernet (NAT Network Switch)

- Now, you can create vms as many as you can, they are depending on your RAM and storage space, and they won’t charge extra cost.
- If you would like to do port forwarding function from Public IP addresses to nested guest vms, we need to enable routing and NAT function at this Azure virtual machine.
- Login Azure Virtual Machine.
- On the Dashboard page, select Add Roles and features
- On the Before you begin page, click Next.
- On the Select installation type page, click Next.
- On the Select destination server page, click Next.
- On the Select server roles page, select Remote Access and click Next.
- On the Select features page, click Next.
- On the Remote Access page, click Next.
-
On the Select Role services page, select Routing and click Add Features and then click Next.

- On the Web Server Role (IIS) page, click Next.
- On the Select role services page, click Next.
-
On the Confirm installation selections page, select Restart the destination server atomically if required, click Install.

- On the Installation progress page, click Close.
-
Open Routing and Remote Access tool.

-
Right click the serve name and select Configure and Enable Routing and Remote Access.

-
On the Welcome page, click Next.

-
On the Configuration page, select Network address translation (NAT), click Next.

-
On the NAT Internet Connection page, select Ethernet 2 as public Interface, click Next.

-
On the Name and Address Translation Services page, select Enable basic name and address services, click Next.

-
On the Address Assignment Range page, click Next.

-
Click Finish on the Completing setup wizard page.

-
Expand the IPv4 and select NAT.

-
Right-click Ethernet 2 and select Properties.

-
Select Address Pool and click Add.

-
Enter IP addresses and mask and click OK, those IP addresses are being created with Public IP addresses at azure portal.

-
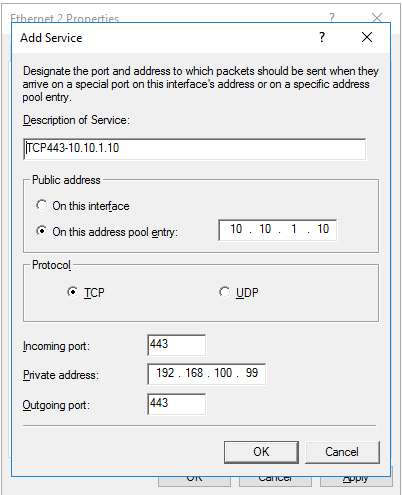
Select Services and Ports and then click Add.

-
Settings as follow for TCP port 443 port forwarding and then click OK.
Description of Services: TCP443-10.10.1.10
On this address pool entry: 10.10.1.10
Protocol: TCP
Incoming port: 443
Private IP address: 192.168.100.99
Outgoing port: 443

- On the Ethernet 2 properties page, click OK.
- Don’t forget to set allow TCP port 443 permissions at windows servers’ firewall and Azure NSG.
Now, you have fully control for your environment, and you also can get more public IP addresses if you need them.
Hope you enjoy this post.
Cary Sun
Twitter: @SifuSun
Author: Cary Sun
Cary Sun has a wealth of knowledge and expertise in data center and deployment solutions. As a Principal Consultant, he likely works closely with clients to help them design, implement, and manage their data center infrastructure and deployment strategies.
With his background in data center solutions, Cary Sun may have experience in server and storage virtualization, network design and optimization, backup and disaster recovery planning, and security and compliance management. He holds CISCO CERTIFIED INTERNETWORK EXPERT (CCIE No.4531) from 1999. Cary is also a Microsoft Most Valuable Professional (MVP), Microsoft Azure MVP, Veeam Vanguard and Cisco Champion. He is a published author with several titles, including blogs on Checkyourlogs.net, and the author of many books.
Cary is a very active blogger at checkyourlogs.net and is permanently available online for questions from the community. His passion for technology is contagious, improving everyone around him at what they do.
Blog site: https://www.checkyourlogs.net
Web site: https://carysun.com
Blog site: https://gooddealmart.com
Twitter: @SifuSun
in: https://www.linkedin.com/in/sifusun/
Amazon Author: https://Amazon.com/author/carysun