Veeam released the service pack 3a on July, it includes to fix some support issues and it also add to support some current platforms – Microsoft Windows Server 1803, Microsoft Windows Server Hyper-V 1803, Microsoft System Center Virtual Machine Manager 1801, Microsoft Windows 10 April 2018 Update, VMware vSphere 6.7, VMware vCloud Director 9.1…. and added support for Direct Restore to Microsoft Azure for environments with ExpressRoute or site-to-site VPN connectivity to Azure.
The details information you can check from Veeam website https://www.veeam.com/kb2646
The Installation steps are straightforward, but you need to confirm that you are running version 9.5.0.580, 9.5.0.711, 9.5.0.802, 9.5.0.823, 9.5.0.1038, 9.5.0.1335 or 9.5.0.1536 prior to installing this update.
let’s follow the steps and install them.
- Login to your Veeam Backup Management Server.
-
Download BACKUP & REPLICATION 9.5 UPDATE 3a from Veeam website. https://www.veeam.com/kb2646

-
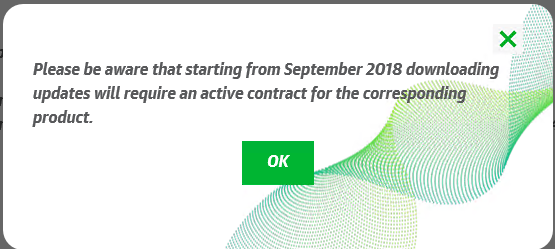
It will pop up a notification and said you will need active contract to download updates from September 2018. That means it’s not free for everyone after September.

- Open Veeam Backup & Replication console.
- Make sure all jobs are successfully, and them disable them.
-
Check the existing Veeam Backup & Replication version from Veeam Backup & Replication console (Help |Abut) and make sure that the version matches the installation requirements.


-
Open download folder and double click veeam_backup_9.5.0.1922.update3a_setup.exe file.

-
Click Yes on the User Access Control page.

-
Click Next on the Welcome page.

-
On the Ready to Install page, click Install.

-
Make sure installed successfully and then click Finish.

-
Open Veeam Backup &Replication 9.5 console and click Connect.

-
On the Components Update page, select all servers and then click Apply.

-
Make sure all components have been upgraded successfully and then click Finish.

-
Check Veeam Backup & Replication version from Veeam Backup & Replication console (Help |Abut) and make sure that the version is 9.5.0.1922.

- Last step, don’t forget to uncheck Disable for all jobs to reenable them.
Hope you enjoy this post.
Cary Sun
Twitter: @SifuSun
Author: Cary Sun
Cary Sun has a wealth of knowledge and expertise in data center and deployment solutions. As a Principal Consultant, he likely works closely with clients to help them design, implement, and manage their data center infrastructure and deployment strategies.
With his background in data center solutions, Cary Sun may have experience in server and storage virtualization, network design and optimization, backup and disaster recovery planning, and security and compliance management. He holds CISCO CERTIFIED INTERNETWORK EXPERT (CCIE No.4531) from 1999. Cary is also a Microsoft Most Valuable Professional (MVP), Microsoft Azure MVP, Veeam Vanguard and Cisco Champion. He is a published author with several titles, including blogs on Checkyourlogs.net, and the author of many books.
Cary is a very active blogger at checkyourlogs.net and is permanently available online for questions from the community. His passion for technology is contagious, improving everyone around him at what they do.
Blog site: https://www.checkyourlogs.net
Web site: https://carysun.com
Blog site: https://gooddealmart.com
Twitter: @SifuSun
in: https://www.linkedin.com/in/sifusun/
Amazon Author: https://Amazon.com/author/carysun
