Today, I am going to show you how to deploy simple Remote Desktop Gateway on the Microsoft Windows Server 2019 without complete Remote Desktop Services Infrastructure. It means I don’t have a farm of RD session host servers sitting behind and I don’t want to deploy Connection broker, web access and session host server (e.g. complete infrastructure).
- Login to Windows Server 2019.
-
Open server manager and select add server roles and features.

-
On the Before You Begin page, click Next.

-
On the Installation Type page, select Role-based or feature based Installation.

-
On the Server Selection page, make sure select the Windows 2019 server and click Next.

-
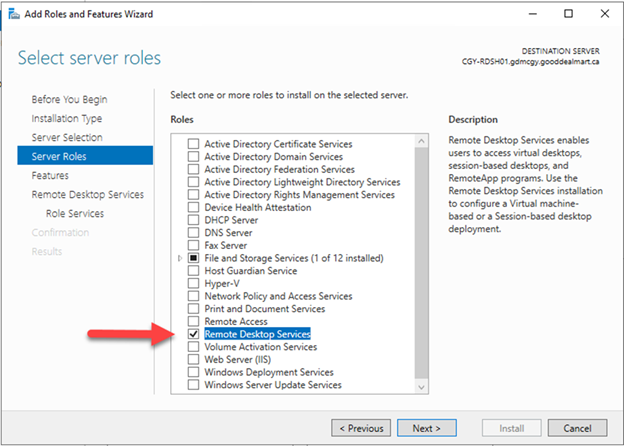
On the Select server roles page, select Remote Desktop Services, click Next.

-
On the Select features page, click Next.

-
On the Remote Desktop Services page, click Next.

-
On the Select role services page, select Remote Desktop Gateway.

-
On the Add features that are required for Remote Desktop Gateway page, click Add features.

-
On the Select role services page, click Next.

-
On the Network Policy and Access Services page, click Next.

-
On the Web Server Role (IIS) page, click Next.

-
On the Select role services page, click Next.

-
On the Confirm installation selections page, select Restart the destination server automatically if required.

-
Click Yes on the restart warning message page and then click Install.

-
On the Results page, make sure installation progress without issues, click Close.

-
On the Server Manager, select Tools, click Remote Desktop Services and then click Remote Desktop Gateway Manager.

-
On the RD Gateway Manage page, select the windows server 2019 gateway server (in my case is CGY-RDSH01), click View and modify certificate properties of Configuration Status.

-
On the Properties page, in my case, I would like to access corporate network (servers) from External, so I need to purchase and install certificate from public CA. Select Import a certificate into the RD Gateway CGY-RDSH01 Certificates (Local Computer) Personal Store, click Browse and Import Certificate.

-
I have done exported the wildcard certificate .pfx file from other server and copied it to gateway server, select the .pfx file, click Open.

-
Enter Private key password, click OK.

-
Make sure the certificate successfully imports to RD Gateway server, click OK.

-
On the Properties page, click OK.

-
On the RD Gateway Manager, expand the RD gateway server, select Policies, click Create New Authorization.

-
On the Authorization Policies page, select Create a RD CAP and a RD RAP (recommended), click Next.

-
On the Connection Authorization Policy page, type the name for the RD CAP, in my case is RD CAP Policy.

-
On the Requirements page, select Password and click Add Group at User group membership (required).

-
Enter the security group name which allows to connect to the gateway server, in my case is Domain Users, click OK.

-
On the Device Redirection page, in my case, I allow device redirection for all client devices, select Enable device redirection for all client devices, click Next.

-
On the Session Timeout, select enable the, and change the idle and session timeout period settings as your requirements, click Next.

-
On the RD CAP Summary page, click Next.

-
On the Resource Authorization Policy page, type the name for the RD RAP, in my case is RD RAP Policy, click Next.

-
On the User Group, in my case is Domain Users, click Next.

-
On the Network Resource, in my case, select Allow users to connect to any network resource (computer), click Next.

-
On the Allowed Ports, select Allow connections only to port 3389, click Next.

-
On the RD RAP Summary page, click Finish.

-
On the Confirm Policy Creation page, click Close.

-
On the RD Gateway Manager, select the Gateway server (in my case is CGY-RDSH01), click Add RD Gateway Server Farm members at Configuration Status.

-
On the Properties page, select Server Farm, type the Gateway server name for RD Gateway server farm member, in my case is CGY-RDSH01, click Add.

-
On the Properties page, click Apply.

-
Make sure the Status of Gateway server shows OK (it may need to take some time for the server to start services), click OK.

- Now, it’s the time to test gateway function from External client machine.
- Open Remote Desktop Connection from External Client.
-
Enter computer name of corporate machine (client or server), click Show Options.

-
Select General and enter User name, click Advanced.

-
On the Advanced page, click Settings at Connect from anywhere.

- On the Connection settings page, select Use these RD Gateway server settings, type FQDN of gateway server to the server name filed.
-
On the Logon settings, select Use my RD Gateway credentials for the remote computer, click OK.

-
On the Remote Desktop Connection page, click Connect.

-
Enter the password of domain user, click OK.

-
It will connect to the machine directly from external.

Hope you enjoy this post.
Cary Sun
Twitter: @SifuSun
Author: Cary Sun
Cary Sun has a wealth of knowledge and expertise in data center and deployment solutions. As a Principal Consultant, he likely works closely with clients to help them design, implement, and manage their data center infrastructure and deployment strategies.
With his background in data center solutions, Cary Sun may have experience in server and storage virtualization, network design and optimization, backup and disaster recovery planning, and security and compliance management. He holds CISCO CERTIFIED INTERNETWORK EXPERT (CCIE No.4531) from 1999. Cary is also a Microsoft Most Valuable Professional (MVP), Microsoft Azure MVP, Veeam Vanguard and Cisco Champion. He is a published author with several titles, including blogs on Checkyourlogs.net, and the author of many books.
Cary is a very active blogger at checkyourlogs.net and is permanently available online for questions from the community. His passion for technology is contagious, improving everyone around him at what they do.
Blog site: https://www.checkyourlogs.net
Web site: https://carysun.com
Blog site: https://gooddealmart.com
Twitter: @SifuSun
in: https://www.linkedin.com/in/sifusun/
Amazon Author: https://Amazon.com/author/carysun
