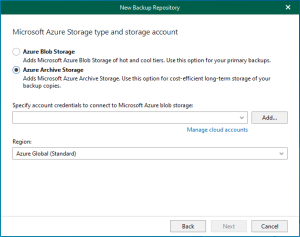
Staring from Veeam Backup for Microsoft Office 365 V4, you will be able to leverage Object Storage to offload your Office 365 data. You can choose from different providers such as Amazon S3, Microsoft Azure Blob, IBM Cloud or S3 compatible object storage providers or even on-premises object storage.
Today, I am going to show you how to use Veeam Backup for Microsoft Office 365 V4 with Modern Authentication backup to Azure Blob.
-
Login to Office 365 portal, click Admin.

-
On the Microsoft 365 admin center, select Exchange.

-
On the Exchange admin center, select permissions.

-
On the admin roles page, click +.

-
On the new role group page, type ApplicationImpersonation as name, click + to add role.

-
On the DISPLAY NAME, select ApplicationImpersonation, click add and then click OK.

-
On the Members, click + to add a user (users) account to be member.

-
On the Name page, select a user (users), click add and then click OK.

-
On the new role group page, click Save.


-
Login to Azure portal, click Create resource.

-
On the New page, select Storage account – blob, file, table, queue.

-
On the Storage account page, click Create.

-
On the Create storage account page, select Basics and configure as follow and then click Next:Networking.
Subscription: select your Azure subscription, e.g. Pay-As-You-Go.
Resource group: click create new and enter a name for the resource name and then click OK.

Storage account name: enter a name for the storage account.
Location: select your location.
Performance: select Standard.
Account kind: select Storage V2 (general purpose v2).
Replication: select Locally-redundant storage (LRS).
Access tier (default): select Cool.

-
On the Networking page, select Public endpoint (all network) and then click Next:Advance.

-
On the Advanced page, configure as follow and then click Next:Tags.
Secure transfer required: select Enabled.
Large file shares: select Disabled.
Blob soft delete: select Disabled.
Hierarchical namespace: select Disabled.

-
On the Tags page, click Next:Review + create.

-
On the Review + create page, make sure Validation passed and then click Create.

-
It may need few mins to create the new storage account, click Go to resource after the storage account is ready.

-
On the created storage account page, select Access keys.

-
On the Access keys page, copy Storage account name and key of key1, we need them for Veeam storage repository settings later.

-
On the created storage account page, select Containers.

-
On the Containers page, click +Container.

-
On the new container page, enter a name for your new container, select Private (no anonymous access) as Public access level and then click OK.


- Login to Veeam backup for Microsoft Office 365 server.
-
Open Veeam Backup for Microsoft Office 365 connect to…. Console.

-
On the User Account Control page, click Yes.

-
Click Connect on the Veeam Backup for Microsoft Office 365 console connect page.

-
On the Veeam Backup for Microsoft Office 365 home page, select BACKUP INFRASTRUCTURE.

-
On the BACKUP INFRASTRUCTURE page, select Object Storage Repositories.

-
On the Object Storage Repositories page, click Add Object Storage.

-
On the Object storage repository name and description page, type Azure Blob as Object storage repository name, click Next.

-
On the Object storage type page, select Microsoft Azure Blob Storage, click Next.

-
On the Microsoft Azure storage Account page, click Add on Specify account credentials to connect to Microsoft blob storage item.

-
Paste Azure storage account name as Account and paste key1 as Shared key (you copied them when you created Azure storage account), click OK.

-
On the Microsoft Azure storage Account page, select Azure Global (Standard) as Region, click Next.

-
On the Microsoft Azure Blob container page, select an Azure Blob container (you created it previously when you create Azure Storage Account and settings), click Browse on Folder.

-
On the Select the folder page, click New Folder.

-
Type a name as the new folder name, click OK.

-
On the Microsoft Azure Blob container page, click Advanced.

-
On the ADVANCED SETTINGS page, if you would like to control the storage spend, select Limit object storage consumption and put the storage size for it, click OK.

-
On the Microsoft Azure Blob container page, click Finish.

-
On the BACKUP INFRASTRUCTURE page, select Backup Repositories.

-
On the Backup Repositories page, click Add Repository.

-
On the Specify details for backup repository page, type Azure Blob-Office365 as repository Name, click Next.

-
On the Specify location for backup repository page, select your Backup proxy server and click Browse for Path.

-
On the select folder page, click New folder.

-
Type your folder name and click OK.

-
On the Specify location for backup repository page, click Next.

-
On the Specify if you want to extend your backup repository to object storage page, select offload backup data to object storage and select Azure Blob (you just created it).

-
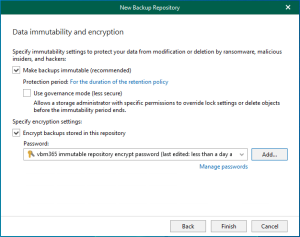
Select Encrypt data uploaded to object storage, click Add for Password.

-
Enter Password and click OK.

-
Click Next on the Object storage backup repository page.

-
On the Specify retention policy settings page, I am going to keep the default settings, click Advanced.

-
On the ADVANCED SETTINGS page, you can change the retention policy schedule as you need, click OK.

-
On the Specify retention policy settings page, click Finish.

-
On the HOME page, select ORGANIZATIONS.

-
Click Add Org.

-
On the Organization deployment type page, select Microsoft Office 365, select Exchange Online, select SharePoint Online and OneDrive for Business, click Next.

-
On the Office 365 connection settings page, select Default as Region, select Modern authentication, click Next.

-
Please follow steps to configure a user account for Modern authentication, login to Office 365 portal, click Admin.

-
On the Microsoft 365 admin center, select Azure Active Directory.

-
It will pop up and ask you to sign in with Azure user credential.

-
On the Azure Active Directory admin center, select Azure Active Directory.

-
On the Overview page, select App registrations.

-
On the App registrations page, click +New registration.

-
On the Register an application page, type VBO APP as name, select Accounts in this organizational directory only (xxx only – Single tenant), click Register.

-
On the VBO APP page, copy Application (client) ID to notepad (we need this information for Veeam settings), click View API permissions.

-
On the VBO APP – API permissions, click +Add permission.

-
On the Request API permissions page, select Microsoft API, click Microsoft Graph.

-
On the Microsoft Graph page, select Application permissions.

-
On the Request API permissions page, Directory Read All, select Group Read All, click Add permissions.

-
On the VBO APP – API permissions page, remove User read (Delegated) permission.

-
On the Remove permission page, click Yes remove.

-
On the Configured permissions page, click Grand admin consent for XXXX.

-
Click Yes to make sure you want to grant consent for the request permissions for all accounts.

-
On the VBO – API permissions page, select Certificates & secrets.

-
On the Client secrets, click +New client secret.

-
On the Add a client secret, type VBO APP as description, select Never as Expires (or you can select 1 or 2 years), click Add.

-
Copy the new client secret value to notepad, we need it later for Veeam settings.

-
On the Microsoft 365 admin center, click your login account.

-
On your login account and select My account.

-
On the My account page, select Security & Privacy.

-
On the Security & privacy page, select Additional security verification.

-
On the Additional security verification page, click Create and manage app passwords.

-
It will pop up and ask for login credential.

-
On the additional security verification app passwords page, click create.

-
On the Create app password page, type VBO APP as Name, click next.

-
On the Your app password page, click cop password to clipboard and paste to notepad (we need it for Veeam settings later), click close.


-
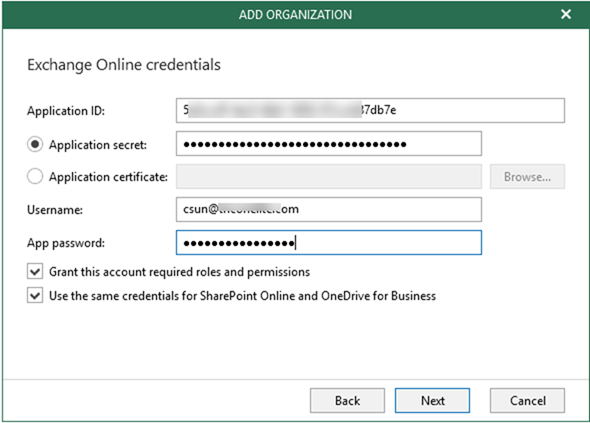
Now we got all information for Veeam MA settings, we can backup to Veeam backup for office 365 settings continually, on the Exchange Online credentials, enter Application ID, Application secret, Username and App password, select Grant this account required roles and permissions, select Use the same credentials for SharePoint Online and OneDrive for Business, click Next.

-
On the Verifying connection and organization parameters page, make sure all of them are show green without issues, click Finish.

-
On the HOME page, select your organization, click Backup Jobs.

-
On the Specify job name and description page, enter name for your backup job. Click Next.

-
On the Select objects to back up page, select Back up entire organization if you have enough users license for entire organization, if not, you need to select Back up the following objects. You can add by users, groups, sites and Organization. Click Next after you add them.

-
On the select objects to exclude page, you can add by users, groups, sites and Organization. Click Next after you add them.

-
On the Specify backup proxy and repository page, select backup proxy and Azure Blob repository and then click Next.

-
On the Select scheduling options page, enter your schedule information and click Create.

-
Select the new created backup job and click Start.

Hope you enjoy this post.
Cary Sun
Twitter: @SifuSun
Author: Cary Sun
Cary Sun has a wealth of knowledge and expertise in data center and deployment solutions. As a Principal Consultant, he likely works closely with clients to help them design, implement, and manage their data center infrastructure and deployment strategies.
With his background in data center solutions, Cary Sun may have experience in server and storage virtualization, network design and optimization, backup and disaster recovery planning, and security and compliance management. He holds CISCO CERTIFIED INTERNETWORK EXPERT (CCIE No.4531) from 1999. Cary is also a Microsoft Most Valuable Professional (MVP), Microsoft Azure MVP, Veeam Vanguard and Cisco Champion. He is a published author with several titles, including blogs on Checkyourlogs.net, and the author of many books.
Cary is a very active blogger at checkyourlogs.net and is permanently available online for questions from the community. His passion for technology is contagious, improving everyone around him at what they do.
Blog site: https://www.checkyourlogs.net
Web site: https://carysun.com
Blog site: https://gooddealmart.com
Twitter: @SifuSun
in: https://www.linkedin.com/in/sifusun/
Amazon Author: https://Amazon.com/author/carysun
